Image Captioning in Browser using Tensorflow.js
Nilay Shrivastava
The holy grail of Computer Science and Artificial Intelligence research is to develop programmes that can combine knowledge/information from multiple domains to perform actions that currently humans are good at. In this spirit, Image Captioning stands as a great test-bed for AI algorithms since it involves building understanding of an image and then generating meaningful sentences on top of it. Formally Image Captioning is defined as the process of automatically generating descriptions of the scene shown in an image. The aim of this post is not to provide a full tutorial on Image Captioning. For that I would encourage you to go through Andrej Karpathy’s presentation and Google’s Show and Tell paper.
This post summarises my approach for implementing a captioning model for browser (that is doing all computations in browser) using Tensorflow.js.
TLDR; Demo
To run the demo, click here. For the code, click here.
Deploying deep learning models on web is challenging since web imposes size constraints. This forced me to reduce number of parameters of the model substantially which in turn decreased accuracy. So the captions may sometimes be wayward.
Moreover since the model uses LSTMs, TensorFlow.js warns about slowness resulting from Orthogonal Initialization. So your browser (especially Firefox) may warn you about this page slowing down your browser or your UI might get unresponsive for sometimes. Don’t worry that is happening because JavaScript is performing heavy blocking computation!
Dataset Used
Most state-of-the-art neural architectures have been trained using Microsoft Common Objects in Context (MSCOCO) dataset. The dataset weighs around 25GB and contains more than 200k images across 80 object categories having 5 captions per image. Unfortunately I am an undergrad and I don’t have access to computational power required to process such a huge dataset.
Therefore I used Flickr8k Dataset provided by University of Illinois Urbana-Champaign. The dataset is 1GB large and consists of 8k images each having 5 captions. Due to its relatively small size I could easily use Flickr8k with Google Colab notebooks.
Model Architecture
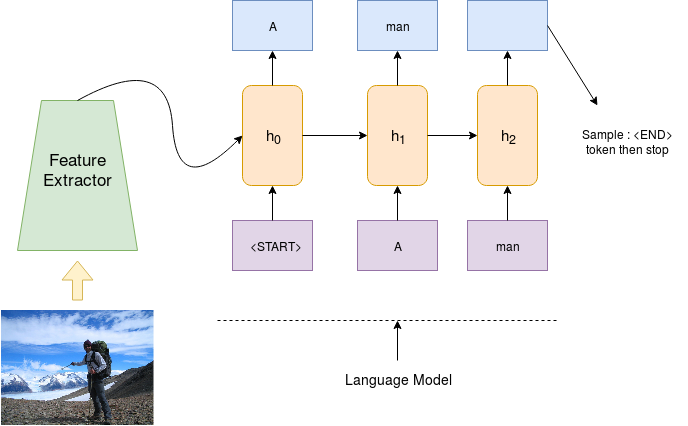
As shown above the complete neural captioning architecture can be divided into two parts.
- The Feature Extractor : which takes an image as input and outputs a low dimensional condensed repersentation of the image.
- The Language Model : which takes the condensed representation and a special START token and generates a caption.
We stop the caption generation process when the language model emits an END token or the length of the caption increases a threshold. In the demo, this threshold has been set to 40 which is the maximum length of captions in Flickr8k dataset.
Feature Extraction from Image: MobileNets
Since the input data is an image, it is clear Convolutional Neural Networks (CNNs) are an attractive option as feature extractors. For high accuracy, most image captioning projects on Github use Inception or Oxford’s VGG Model. Though good for a desktop demonstration, these models aren’t suited for a fully front-end demo as they are quite heavy and compute intensive.
So I turned to MobileNet which is a class of light low-latency convolutional networks specially designed for resource constrained use-cases. In the complete architecture, MobileNet generates a low-dimensional (1000 dimensional Tensor) representation of input image, which is fed to the language model for sentence generation.
Natural Language Generation: LSTMs
To generate captions, Long Short Term Memory (LSTM) layers were used. LSTM based models are in most cases de-facto models for sequence modelling tasks. These are actually a specialised variant of a larger class of models called Recurrent Neural Networks which I have described in a previous post.
The feature vector obtained from MobileNet is applied at every time step in the LSTM layer. This is essentially a design choice and I was influenced by the repositories I referred.
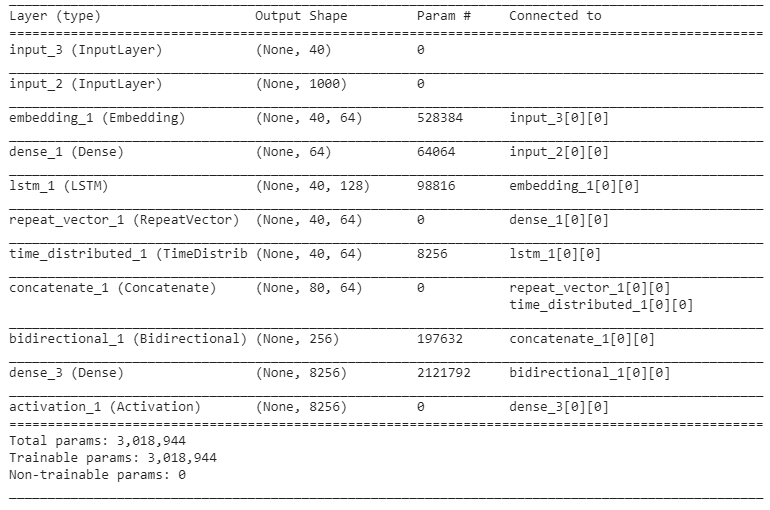
Skeleton Code for the Model and Model Summary
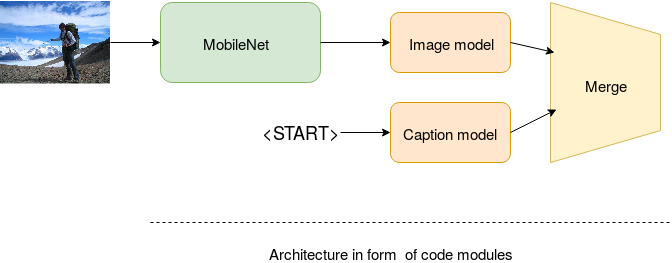
The above image shows the code structure of the architecture. MobileNet as described above will be used to output a 1000 dimensional represantation of input image. We take this representation and insert into the image model which contains a Keras layer called RepeatVector that will essentially create copies to be fed into every time-step of the LSTM language model as discussed above
image_inp = Input(shape=(1000,)) # input from MobileNet
image_model = Dense(embedding_size,input_shape=(1000,),activation='relu')(image_inp)
image_model = RepeatVector(max_len)(image_model)
The caption model will be built from the Embedding lookup and a TimeDistributed Dense Layer
caption_inp = Input(shape=(max_len,))
caption_model = Embedding(vocab_size,embedding_size,input_length=max_len)(caption_inp)
caption_model = LSTM(128,return_sequence=True)(caption_model)
caption_model = TimeDistributed(Dense(64))(caption_model)
Finally both modules are merged in the following way
merge_model = Concatenate(axis=1)([image_model, caption_model])
merge_model = Bidirectional(LSTM(128,return_sequences=False))(merge_model)
merge_model = Dense(vocab_size)(merge_model)
The model obtained can be summarised as follows:
Caption Generation in Browser
For the demo I used TensorFlow.js, A JavaScript library for training and deploying models in browser (other alternatives like Onnxjs do exist and I plan to work on them in future). The feature extractor part, i.e. MobileNet was easily obtained as pretrained model from TensorFlow.js-models repo using the following code :
const mobilenet = await tf.loadModel('https://storage.googleapis.com/tfjs-models/tfjs/mobilenet_v1_0.25_224/model.json');

// remove the top layer of mobilenet to use it as feature extractor
const layer = mobilenet.getLayer('conv_preds');

mobilenet = tf.model({
    'inputs': mobilenet.inputs,
    'outputs': layer.output
});
The trained Keras model was sharded using tfjs-converter. The shards as well as the model.json file obtained using the converter are then loaded in the browser using the following code snippet:
// model.json and shards are to be kept in same folder
model = await tf.loadModel('model/model.json');
For the prediction part I used normal max search which was implemented using the following subroutine:
function caption(img) {

    let flattenLayer = tf.layers.flatten();
    return tf.tidy(()=> {

        // startWord will eventually contain the entire caption
        let startWord = ['<start>'];
        let idx,wordPred;

        // feature extraction using mobilenet
        let e = flattenLayer.apply(mobileNet.predict(img));

        while (true) {
            /* caption generating loop */

            let parCaps = []; // word that is fed into the language model
            for (let j = 0; j < startWord.length; ++j) {
                parCaps.push(word2idx[startWord[j]]);
            }
            parCaps = tf.tensor1d(parCaps)
                        .pad([[0, maxLen - startWord.length]])
                        .expandDims(0);

            // feature representation and word fed together
            let preds = model.predict([e,parCaps]);

            preds = preds.reshape([preds.shape[1]]);

            idx = preds.argMax().dataSync();
            wordPred = idx2word[idx];

            startWord.push(wordPred);
            if(wordPred=='<end>'||startWord.length>maxLen)
                break;
        }
        /* right now startWord contains <start> and <end>*/

        // removing <start> and <end>
        startWord.shift();
        startWord.pop();

        cap = startWord.join(' ');
        capField.innerHTML = cap;

    });
}
The Hard Part: Engineering Issues
The primary issue faced while developing the demo were:
- Reducing model size while still retaining significant accuracy.
- Learning how to use FileReader API in order to add an upload option, something which I hadn’t done before.
- Making caption generation as non-blocking as possible. When I wrote the first javascript implementation, the browser used to take around 6 minutes to generate captions after clicking the generate button. Its much lesser now but still not as interactive as ideally one would expect. The reasons behind this are as follows:
- Orthogonal Initialization: Tensorflow.js complains that this is would slow down the application but I couldn’t find any solution. I think it is because of the LSTM layers used in the model
- The while loop generating the caption (in caption()) blocks the UI thread making the app unresponsive for sometime. I tried a lot of solution including making the loop completely recursive as suggested here, but couldn’t succeed. I would welcome any help on these issues!!
Complete Code
The complete code can be found here. The training code is in form of a Google Colab Jupyter Notebook for easy reference. All you need to do to run it is to first upload the Flickr8k dataset on your google drive, then upload the notebook on google colab and execute it.
Acknowledgement
- I was inspired by Zaid Alyafaei’s Deep Learning projects which are also a great source for getting acquianted with TensorFlow.js
- The code used for training the model is essentially built over Yash Katariya’s code for Image Captioning.